Multimedia
Programs
module last modified: March 27, 2002
Macromedia Director 8.0
PLATFORM
You can do this module all the way through on either the Mac or the PC side
of the CCLI. A few steps below will vary if depending on the platform you are
using and these are noted below.
PURPOSE OF THIS MODULE
This module will have you make a very basic multimedia presentation, using Macromedia
Director 8. Director 8 is an industry standard. In this module, you will get
a basic familiarity with Director. There's a whole lot more that Director can
do besides what you will learn here–but this will be enough to familiarize
you so that you can learn a lot more if you want. At the end of this module,
you'll have made a presentation that:
- contains
a simple animation
- allows
users to click buttons to make things happen
- shows
movement
- uses text
You should
probably read each step all the way through before you try it. This module is
too long for you to read the whole thing all the way through before you do it,
but you will probably find it easier to do if you read each step first.
STEPS
FIRST, PLANNING AHEAD
If working on the Macs, be sure to use one of the G4s (clear/gray cases) or
the G3s (blue/translucent cases). They are much faster and therefore easier
to work on in general and for this project in particular (Director and PhotoShop
are very large programs that require a lot of memory to run simultaneously.
PREPARING FOR SOME ANIMATION
- In PhotoShop
or Illustrator (if you make the drawings in Illustrator, import them to PhotoShop
after you make them and follow the remaining directions), make a series of
small drawings that, when made to show sequentially on screen, will make animation.
You can make a person walking, a tree growing, a glass breaking, whatever...
make at least 6 drawings for your animation. (If you created the bonus section
for ImageReady, you can reuse these images or create new ones).
- Make the
drawings be no more than about 2" by 2" –this is for memory's
sake. To do this click on "File>New", change "points"
on width and height to "inches" and then change both to the number
2.
- When you
have finished with the drawings, convert them all to 8-bit graphics. You do
this by choosing Image>Mode>Indexed. You may have to play with the "Indexed..."
dialog box to get your drawings to look their best; you may also lose some
quality in your drawings, but you will gain speed & have fewer memory
problems once you have imported the drawings into Director. (You will also
save space on your Home Directory.)
- For easiness
in importing the graphics to Director, save all your images as PICT images
into their own folder. PhotoShop will ask you if you want to flatten your
image. Click "OK," otherwise you will not be able to save as a PICT.
You will have to Undo this in the History Panel to return to the layered version
of your image so that you may continue altering it. Director 8 can import
other kinds of formats, but PICTs will take up little memory. Also, if you
save your images into one folder, you can import them all at once into Director.
- When you
save your drawings, number them. For example, name the first drawing something
like "01" and then the second "02", and so on. This way,
they will import in order into Director.
OPENING
& LOOKING AROUND DIRECTOR
Once you have saved your drawings to your Home Directory, quit PhotoShop, and
open Director 8:
On the Mac
Access Director 8 from the Apple menu (pull down to "Local Applications"
and then choose Director 8 from the submenu that will appear).
On the PC
Open up Start>Multimedia>Director 8
- When Director
is open, you may see many windows on screen–or just one big white one.
This will depend on who used the application last. If there are many open
windows, close every one that has a Close Box in its upper left corner. There
will be one window without a Close Box: this is a big white space, called
the "Stage".
- Go up
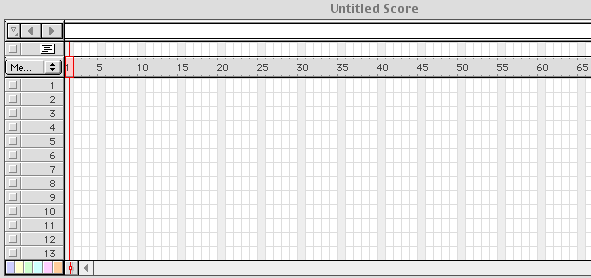
to the Window menu, and choose "Score". A window with a grid in
it will open. This is the place where you will have a visual record of your
animation–and where you can manipulate your animation.

- Director
works like traditional film animation: just as with film animation, you build
a multimedia project with Director frame by frame.
- The grid
you see in the Score window shows, horizontally, the different frames of your
project. Towards the top, you see numbers, in 5s: these numbers count off
the different frames.
- Going
down, there are numbers also. These numbers refer to how many objects–or
Castmembers–there are on screen. If you were to have, for example, a
project that had three buttons on its opening screen, you would see here the
cells numbered 1, 2, and 3 (going down) with information in them. A row of
cells going across is called a channel.
- Across
the very top of this window are features you will learn about later.
- Go up
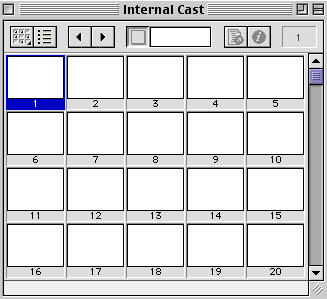
to the Window menu, and choose "Cast". A window with several numbered
boxes will open. The Cast window is where you will be able to see–and
access–the objects (drawings, buttons, sounds, text) that you use in
your multimedia project.

- Finally
(for now), go up to the Window menu, and choose "Control Panel".
This brings up a small window with VCR-like controls on it. Once you have
made or imported some castmembers, and put them on Stage, you can control
your work with this window.
IMPORTING YOUR DRAWINGS
- In the
Cast window, click in box 1 to highlight it (it will have a blue box around
it). (If these boxes are not visible, click the icon that looks like it has
bulletted points on it-

- From the
File menu, choose "Import..." A dialog box will appear.
- There
is a pop-up menu labeled "Show:" towards the middle of the dialog
box. You can make this menu have the setting of "All Files" or just
"PICT" (but notice the other kinds of resources that Director can
import through this menu).
- Use the
top of the dialog box to find the images you made in PhotoShop and saved to
your Home Directory.
You can click on your images one-by-one, and then click "Add" after
each one in order to get the files listed at the bottom of the dialog. But,
as long as you have saved all your animation images in one folder together,
you can click "Add All" to move them all at once to the bottom of
the dialog.
Make sure the bottom drop-down menu has "Import PICT file as PICT"
(It may say "Import Standard" as its default). Once all your animation
images are listed at the bottom of the dialog box, click "Import".
The dialog box will close, and you should see that all your images are now
in the Cast. If a dialog box labeled "Image Options" comes up, just
click "OK."
- First,
you are going to make your drawings work as an animation, then you will make
a button that allows a user to control the animation.
- Have the
Cast, Score, and Control Panel open. This will take up a lot of screen space,
but do your best to arrange the windows so that you can see as large a part
of the Stage as possible.
- Click
on the first image in the Cast window, then hold the shift key, and click
on the LAST image: this will select all those images.
- From the
Modify menu, choose the "Cast to Time" option.
- After
you make this menu choice, you will see in the middle of stage the first image
of your animation.
- If you
look in the Score, you will also see that several frames have been colored,
in the first channel: Director has taken your images and built them into a
little sequential animation. The number of cells taken up by the colored band
shows how many images you made.
- Click
the Play button in the Control Panel (it looks like the Play button on a VCR,
a right pointing arrow).
- Your images
have been automatically animated for you.
- Stop the
animation (click the square Stop button in the Control Panel).
- Click
the image showing on the Stage, and move it around.
- Play the
animation again -- notice that it now plays wherever you moved it.
Moving an animation in the Score
- Now you
will move the little animation you just made, so that you can add some other
elements.
- In the
Score window, click the bar that represents the animation you just made, and,
while holding the mouse down, move the mouse to the right. The whole line
will move -- move the animation over so that it starts at about frame 25.
- Try playing
your animation again. There will now be a bunch of white frames, with nothing
happening in them, before your animation plays.
MAKING A BUTTON to control your animation
- Any object
in Director can be made to respond to a user's input, but there are objects
called "buttons", which are easy to make and which can be
made to highlight in response to a user's click.
- You are
about to make a button, but first you want to "tell" Director the
frame in which you want the button to appear.
- In the
Score window, click in the very first frame in the second channel (the animation
is in channel 1), the "2,1" frame. That
cell will highlight. Now you are ready to make your button.
- With the
Score and the Cast windows open (and as much out of the way as you can make
them), choose "Tool Palette" from the Window menu.
- At the
top of the small palette that appears, there are various small boxes. You
click on them to make different kinds of objects. At the bottom of the palette
are options for choosing colors and lines for the objects you can make.
- Click
the tool named "Button."
- Move the
cursor out to the Stage and draw a rectangle. It doesn't matter what size
you make the rectangle–you can always adjust it.
- As long
as you hold the mouse down, you'll see a dotted rectangle. When you release
the mouse, this rectangle will get a thick outline around it, and will have
a cursor blinking in it.
- The rectangle
is a button, waiting for a name and some other attributes. The heavy rectangle
means that the button is selected, and that you can therefore make changes
to it, which you will do in the next step.
- Notice
that there is now some information in the cell you clicked in the Score window.
You'll learn more about what this means later).
- As long
as the button is selected, type "Click here" on the keyboard. You'll
see these words appear in the button. (You can name the button anything you
like–"Click here" is just a suggestion.)
- If you
can't type into the button, select the Arrow at the top of the Tool palette,
and then double-click the button: you'll now be able to type in a name.
- Drag-select
the words, just as you would in a word-processing application if you wanted
to make the words be bold or italic.
- From the
Modify menu, choose "Font…".
- This will
bring up a dialog box that allows you to choose the typeface and style and
size you want for the button's words.
- After
you click OK in the Font dialog box, you'll notice that the button changes
size in response to a change in the text size. If the words go onto 2 lines
because you make the words big, you can make them go back onto one line by
lengthening the button: make sure the Arrow tool is selected in the Tool palette,
and then click and drag one of the corners of the button to resize it.
- You can
also move the button anywhere: hold the mouse down over any of the thick edges
around the selected button (except over the "handle" on the right),
and drag.
- Double-click
the button so that you can edit its text, then drag-select the button words
again, and choose a color for them from the Tools palette by following the
next steps.
- Click
and hold the mouse down over the black square that is towards the bottom of
the Tools palette. A palette of colors will appear; choose the one you like,
and the button words will change to that color. You can make different words
be different colors by selecting a single word and choosing its color.
- Double-click
the button again, and drag select its words, and now you can change the color
of the button.
- Click
and hold the mouse down over the white square that towards the bottom of the
Tools palette, under the black square that gave you access to the text color
for the button. A palette of colors will appear here, too; choose the one
you like, and the button background will change to that color.
- Now there's
one last thing to do before you make the button do something: you need to
make the button take up the appropriate space in the Score.
- If you've
closed the Score window, re-open it from the Window menu.
- Look in
channel 2 of the score: you should see a colored bar starting in cell 1 and
going up to the first frame of your animation.
- Click
on the right edge of this bar (it looks like a little rectangle) and
drag this edge to the LEFT, until the colored bar ends at frame 20.
- This way,
you have left some space in between the button and the animation. You don't
*have* to do this when you make your own interactive pieces, but this space
will help you see more easily what you are doing.
- Rewind
your animation and play it…
- Your should
see your button for a while, and then some blank time, and then your animation.
Next you will make Director stay on the button until it is clicked–and
you will script the button so that, when someone clicks it, you go to your
animation.
MAKING THE BUTTON actually do something
- In the
Score window, click in the cell above frame 20, just above the gray frame-number
bar. You have clicked in the Score's Script channel (notice the little icon
of lines over to the left–that's the sign for the Script channel), where
you can enter instructions for what Director should do when, while playing
your piece, it reaches that frame.
- Go up
to the Modify menu, pull down to choose the Frame option, and then choose
"Script" from the submenu that appears.
- A dialog
box, that says "Score Script" at the top, will appear. There will
also be a number in the title of this window; this number shows where in the
Cast window this script will appear once you have finished it. (NOTE
that Director stores all scripts in the Cast window, as well as in the Script
window. This is nothing to worry about, but just something to know.)
- The dialog
box will also have the beginning and ending parts of a script: it will say
"on exit frame", followed by a blank line, followed by "end":
you will enter something on the blank line to tell Director what to do when,
as it is playing, it is ready to move on from frame 20.
- In this
Score Script dialog box, the cursor should already be blinking for you. If
you were to start typing, Director would enter text for you. Type the following:
go frame 1
- (And if,
for some reason, the cursor isn't blinking, just click on the blank line,
and type.)
- Close
this window by clicking its Close Box.
- You should
see, in the Score Window, a number showing in the Script cell you had selected
for frame 20.
- Play the
animation.
- You should
see just the button, and nothing more. The playback head should go to frame
20, and then loop back to frame 1. Watch it as it moves across the numbered
gray bar in the Score window to see this happen. (Also, try clicking on the
button on the Stage: it should highlight: buttons do this automatically in
Director.)
- If your
playback head doesn't loop properly, repeat steps 1 to 3.
- Now you
will make the button do something when someone clicks it.
- In the
Score window, click the entire bar that represents the button in the script,
so that it is highlighted (turns from blue to dark blue). If there is more
than one bar, highlight and delete those bars.
- Go to
the Modify menu, pull down to Cast Member...., and then choose Script from
the submenu that appears.
- The window
for typing in scripts will appear again, but now it will be titled "Script
of Cast Member…" and then the number of where that cast member appears
in the Cast window. Notice that again this window opens with the very beginning
and the very ending of a script; you will supply what happens in the middle.
- (The "on
mouseUp" handler means something will happen when someone first clicks
the mouse down on the button, and then releases the mouse button, so that
it goes up.)
- In between
"on mouseUp" and "end", type:
go frame 25
- Frame
25 should be where your animation starts.
- Close
the Score Script window by clicking its Close Box. Click on "play"
in the control panel. Then click your button.
- When you
click the button, you should see your animation.
- If the
"Loop" button in the Control Panel window is selected (it will look
depressed), Director will return you to your button once the animation is
done. The next step will show you how to make this happen whether or not looping
is turned on.
- Right
click on the first script in the script channel. Then click on "Copy
Sprite".
- Click
in the Script channel above the last frame of your animation. You will be
assigning a line of script here–but this time you won't have to write
a new line of script. All you need to do is right click on the frame and then
"paste sprite."
- If looping
was on in the Control Panel, turn it off (it will look slightly raised if
it is off), and play your animation.
- When you
click your button, you should go to your animation, and then automatically
be returned to the button.
MAKING IT A LITTLE MORE INTERESTING
Now
you will add some text...
- Make a
new button, repeating the steps above for making a button–EXCEPT, start
by clicking in frame 1 of channel 3. Make this button exist in frames 1 to
20 also.
- Follow
the steps above for scripting the button (Steps 6-9 of the "MAKING THE
BUTTON ACTUALLY DO SOMETHING"), but, when you type a script, this time
type "go frame 40". (If the animation you imported from PhotoShop
goes beyond frame 40, however, you will have to pick a higher number, and
use that same number in what follows.)
- In the
Score window, move the playback head (the little red box that moves across
the gray numbered bar) to frame 40:
- Click
on frame 40 in channel 4. Choose the Text tool from the Tools window. (The
text tool is the letter "A" in the top left of the Tools window.)
The cursor changes to a crosshairs.
- Click
and drag the Text tool (the crosshairs) on the Stage. This will make a Text
field.
- Notice
that, in the Score window, starting at frame 40, there is a colored bar to
show the extent of the text field; as with all new objects, the default number
of frames taken up by the new object is 28.
- Type some
text–any text whatsoever–into the field, and give it a font and
style and color in exactly the same way you did for the buttons you made.
(See steps 5-10 under "Making a Button" above.)
- If you
want to modify this text field, click it once to move it or resize it; double-click
it to edit the text (or change its color or the color of the field.)
- In the
Score window, click in the Script channel just above the last frame occupied
by the field.
- Just as
you did for the animation, copy and paste in the script sprite that sent the
score back to frame 1.
- Play your
animation to see what happens. Now go back to the first frame in channel 5.
Making Animation
- Draw a
circle on the stage. You will see it become a cast member automatically.
- Click
the last frame in the score for the circle sprite. Move the keyframe back
so that it is even with the button sprites.
- Now move
the circle on the stage by selecting the colored dot in the upper left hand
corner. You will see a dotted line appear. This line shows the motion that
you just added. Play your project to see what it does.
- Notice
it just moves and then jumps back to the first position when the animation
goes back to the first frame. Hold down the Option key (Mac) or Alt key (PC)
and click on one of the yellow dots toward the middle of the line that shows
the movement of the button. Drag it to the final position, then take the red
dot on the end of the movement line and place it on top of the green dot at
the other end. Play it again to be sure the button goes back and forth.
- Repeat
these steps for the another object, like a square, but this time click the
Alt key before you drag one of the yellow dots. This allows you to change
the movement line from straight to curved.
- Now go
to the top section of the score. Find the two arrows that point to each other
in the upper righthand corner (this is the Show/Hide Effects Channel icon).
Click this open and find the first sound channel. I want you to add a sound
from the references folder on the Groups Drive or find one off of the internet
to use (or record your own).
- Click
on the second frame in the first sound channel.
- Go to
File>Import and find the sound file you want to play in your movie.
- You will
see it appear in the cast window. Drag it from the cast to the score putting
the left end of the box representing the cast member into the frame you want
it.
- Obviously,
this is just the tip of the iceberg with Director (even though you've probably
been at this for hours).
TURNING IN YOUR WORK
The project should have:
- Two buttons
on the opening page
- Two objects
that move on the opening page
- Each object
should be returning to its original place
- Frame
scripts that should loop back to the first frame
- The animation
channel should return to the first frame when done
- The text
cast member should return to the first frame
- Each cast
member should be on their own channel
- Please
put your animation into your Director folder in your turn-in folder in our
class folder, before or on the due date of this assignment. Name your file
"Director", followed by your last name, please. Thank you.
Points
Turned in on time 10
All steps followed 50
Creative animation 15
Instructor’s Discretion 10
Basic points 85
Bonus
Please use one of the Director manuals in the CCLI or go to the very informative
Macromedia Director site (http://www.macromedia.com/support/director/)
to find out how to complete these tasks if you already do not know how to. Choose
a purpose for your creation. This means you will have to think of a design beforehand.
- Add at
least one additional sound to your animation (It can be one of the sound effects
you saved from the web).
- Add at
least two more buttons with specific destinations in the director score.
- Import
at least four graphics you scanned and altered in Photoshop (these should
be one of the destinations for the new buttons and should already be in your
home directory from previous projects). Put the graphics in order on one channel
show that they are seen like a slide show.
- Create
a projector for your animations and save it to the Groups Drive as bonus.exe
or as Bonus Projector on a MAC.
- Put the
animation drawings from the GifBuilder project into Director and see the difference.
Turn in both files so that I can view them and compare.
Bonus POINTS......................15
Total points..........................100
