Manipulating
Photos Using PhotoShop- Part 2
module last modified: February 12, 2002
PhotoShop 6
PLATFORM
You can do the first part of this module on either the Mac or the PC side. Some
steps are slightly different depending on the platform you are using, and those
steps are marked below.
PURPOSE OF THIS MODULE
If you are not careful, this module will have you living in the lab... not because
it is difficult, but rather because it is fun: this program is exceedingly versatile
and if you are creative or you want to be creative, you will love the software
you learn in this module. In this part of the module, you will learn how to:
- make images
look crazy in all sorts of fun ways
- make a scanned
image look like a piece of art using quick mask brush strokes
WHAT YOU WILL BE MAKING
In this module, you will be modifying an image you scanned in an earlier project,
in order to make the following two images.
- one distorted
version of your scan
- one "artistic"
version of your scan (or of another image)
Step
1
Using
PhotoShop to Distort Your Colorized Image
- Choose "Save
As..." from the File menu, and give your colorized file yet a new name,
but be sure you save it to your Home Directory.
- Now, start playing
with all the options under the "Filters" menu of PhotoShop.
There are many possibilities here, thus I am not going to begin to give you
any more instructions than these: just play.
If you get results you do not like, choose "Undo" from the Edit
menu, or "Revert" from the File menu. You can also use the History
pallette to undo multiple steps.
But try out the different options and just see what happens. (You can use
the Marquee tool or the Lasso tool to select just parts of your image, and
have the filters work on only those parts.)
- Make the picture
as interesting and weird looking as you like, but use at least 4 filters,
on different parts of your image. Use the Notes tool to leave me a list of
the filters you used.
- Save your filtered
image, and then turn a copy in to me: choose "Save As..." from the
File menu, and, in the dialog box that appears, rename the file "your_userid_PS2".
If you are working on the Macs, save the file to the "MacTurnin"
folder in our class folder on "Groups." If you are working on the
PC side, use the "PCTurnin" folder on the G: drive.
- Continue playing
with PhotoShop and playing with the other tools in the Tool palette to see
what they do. The only way to truly learn PhotoShop is to play and experiment.
Have fun with this assignment.
Step
2
Using PhotoShop to Add Quick Mask Brush Strokes to
Your Colorized Image
- Open your colorized
image from part A and save a copy to work on. You can also use any other color
image for this part. Set the Image>Mode to RGB color.
- Double-click
on the Quick Mask icon at the bottom right of the toolbox. It looks like this:---->

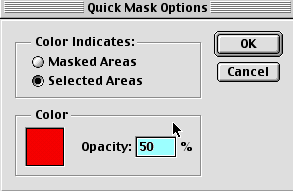
The Quick Mask Options window will pop up. Select the "Channels"
tab on the "Layers" pallette. Use the small black arrow in the upper
right corner to bring up the pop-up menu. Select "Quick Mask Options..."
The window looks like this:------->

- Choose "Selected
Areas" under "Color Indicates". Opacity should be at 50%. Don't
worry about the color. You are now in Quick Mask editing mode.
- With the Marquee
tool (you may have used it above), select the top half of the image, and choose
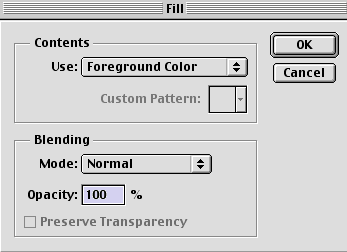
"Fill" from the Edit menu to fill the selection with the color that
was from the previous window (Quick Mask Options).

Hit "OK" and the top half of your image should now be the masked
color. Select "deselect" from the "Select" menu to deselect
the marquee. This is one way of selecting large, regular-shaped areas in Quick
Mask mode. You can continue on with this part of your image selected if it
makes sense to divide your picture this way (if it is a landscape photograph,
for instance). Otherwise go to Edit>Undo or hit Command+Z (Mac) or Control+Z
(PC)
- Press B or simply
click the paintbrush icon on the toolbar. On the ribbon bar just below the
menu bar, select the hard, round 9 pixel brush from the drop-down brush menu.
The ribbon bar will change to look like this:---->

You may want to change sizes later to cover more area or paint in greater
detail.
At the top right, where it says "Opacity", move the slider to 100%.
The painting mode should be "Normal" like above.
- Next, brush
some strokes (as if you were a painter) around the main element or focus of
your image. All of the areas that you brush will later be filtered using the
Dry Brush effect; the unbrushed (areas that you did not brush or marquee select
and quick mask) will later be filtered with chalk and charcoal.
- When you are
finished playing artist, click on the standard editing mode icon (it's beside
the quick mask icon at the bottom left of the toolbox). This will change the
image into a selection marquee. Choose "Inverse" from the "Select"
menu to invert the selection. This will switch the marquee selection to the
part of the image that you did not select with quick mask and did not brush.
- In order to
select the chalk and charcoal colors you will need to set the background and
foreground colors respectively. The computer decides which part of the image
to make chalk and which part to make charcoal. The foreground will be charcoal
and the background will be chalk. The rest of the image will be filled in
by PhotoShop with 50% black (i.e. gray). Double click on the top square, foreground,
(the black one pictured here)---->

and choose the color you want PhotoShop to fill in as charcoal. Then double
click on the bottom square, background, (the white one pictured here) and
choose the color you want PhotoShop to fill in as chalk.
- From the menu
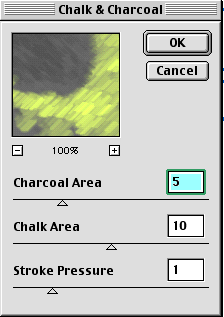
choose Filter>Sketch>Chalk & Charcoal. In the window that pops up
drag the Charcoal slider to 5. This determines how much of the total selection
area receives charcoal (the foreground color you chose).

- Next, drag the
Chalk slider up to 10. This creates more of the background color than foreground
color, i.e. more chalk than charcoal. Lastly, drag the Stroke Pressure slider
to 1. This helps your image look more like art. Click OK.
- Choose "Inverse"
from the "Select" menu to invert the selection again. This should
select the areas you Quick Masked and brushed.
- Now, from the
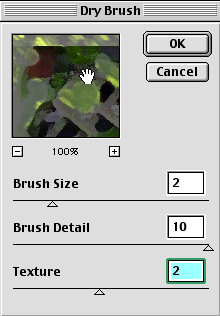
"Filter" menu select Artistic>Dry Brush. The dry brush filter
adds texture to your image once again allowing you to seem like an artist.
A window will pop up like this one:

- Drag the Brush
Size slider to 2. This low setting will increase the detail of the image making
it more like the original. A setting of 10 decreases the brush size, therefore
decreasing the detail and making the image less like the original.
- Drag the Brush
Detail slider to 10 for maximum image intricacy. Finally, Drag the Texture
Slider to 2. Two is the middle setting which changes smoothness. Click OK.
- Choose "Deselect"
from the "Select" menu to deselect the marquee and sit back and
admire you art work.
- Save your artistic
image, and then turn a copy in to me: choose "Save As..." from the
File menu, and, in the dialog box that appears, rename the file "your_userid_PS3."
Make sure the image is RGB and Flattened. See Part A if you do not remember
how. If you are working on the Macs, save the file to the "MacTurnIn"
folder in our class folder on "Groups." If you are working on the
PC side, use the "PCTurnIn" folder on the G: drive.
TURNING IN YOUR WORK
Turn in all files electronically on or before the due date.
POINTS
Turned in on time.....................10
Image 1 (Colorized- Part 1).......20
Image 2 (4 filters)....................20
Image 3 (masked)...................20
Instructor's Discretion............... 15
Basic points.............................85
Bonus Tasks
- Add text to
one of the pictures you made above. Save your image and name it "your_userid_Pstext1".
- Explore how
to use layers. Find one of the many PhotoShop manuals (e.g. Adobe PhotoShop:
Classroom in a Book or the PhotoShop 6 Visual Quick Start Guide)
in the CCLI (ask a consultant to get one out of the black cabinet for you)
and create an image from scratch with 4 or more layers. Experiment with the
paintbrushes (you can load the "Assorted Brushes" for some pre-formed
shapes if you don't like to draw), as well as the Shape and Paintbucket Tools.
Save your image as a ".psd" file (so that I can see your layers)
and name it "your_userid_Pslayer".
- Use a copy of
your layered picture. Add a drop shadow to one layer by going to Layer>Layer
Style>Drop Shadow. Add an Inner Shadow or one of the other layer effects
to another layer. Choose your own settings for the shadows.
- Save these bonus
images as .psd files so that I can see the layers!!!
- As usual you
should save all images in a TurnIn folder under your name in your PhotoShop
folder.
- Each image is
worth 5 points. The more you experiement the better you'll be and the more
points you'll get.
Bonus Points............15
Total Points...........100
