Learning and Using Soundtrack and Soundtrack Pro
The Interface
The interface of Soundtrack is divided into three main sections as shown below.

Workspace
The Workspace has four basic elements for arranging audio: tracks, timeline, playhead, and audio clips. This is the area where you organize and edit audio.

Tracks
Similar to layers in Photoshop, using individual tracks for different audio clips (voice, music, sound effects, etc.) allows you to adjust the controls of each individual element in your composition. As discussed below, you can change the volume of a track relative to other tracks, adjust the pan of a clip, add effects, cut out unnecessary pieces, and make other changes. You can have up to 128 tracks within a single project.
Timeline
The timeline is a visual representation of your project, displaying the position of audio clips, the playhead, and other objects in time.
Playhead
The playhead, marked by a yellow triangle and thin black line, indicates the current position within the timeline.
Audio Clips
Audio clips, shown in green within tracks, are the basic elements of your audio composition. To place an audio clip within the timeline, you drag the file from the Media Manager described below on to one of the tracks. Audio clips can be loops (which repeat over and over) or one-time events. They can also be lengthened, shortened, copied and pasted to repeat, and cut to edit out unwanted sounds.
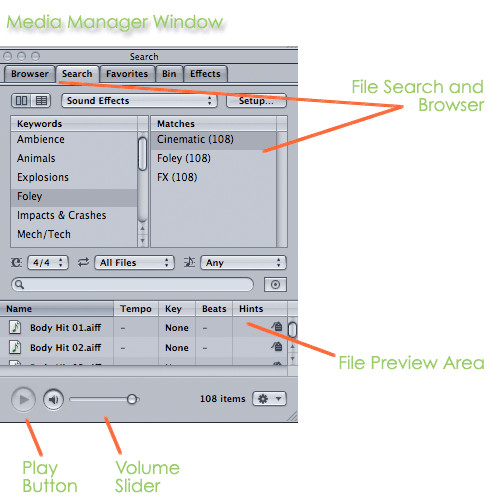
Media Manager Window
The Media Manager window, shown below, is the place where you locate audio files you may want to use in your audio project. Using the Browser tab will allow you to search for music and files outside of those that come with the Soundtrack application (such as those imported into iTunes, from CDs, or from other sources. Soundtrack will recognize .wav .aiff, and .M4a (MPEG-4) file formats, as well as Quicktime (.mov) files (though these may have a lower quality). MP3s must first be converted into one of the formats listed above before it can be opened in Soundtrack.
Using the Search tab will bring up several categories of sound, music, and effects that are bundled with the Soundtrack application. Use the drop-down menu where it says "Sound Effects" in the example below to select a category. You can then use the "Keywords" to search more specifically within those categories.
In the File Preview area, you can click once on a file name and then click the play button to hear what that particular file sounds like (you can also double click these file names to play automatically).
Once you have found a sound clip you want to include in your project, click once on the file name and drag it to an empty track in the timeline.
Preview Window
This window allows you to view information about voice or music recording you are doing directly into Soundtrack. The Recording tab provides a way to choose your input device (built-in microphone, external microphone, musical instrument attached to computer). It also provides a visual representation of sound levels during recording.
The Video tab is used when you import video into the project (or transfer it from Final Cut Pro) to add sound effects, music, or narration not captured with the video. This window plays the video in synch with the Soundtrack timeline so that you can decide where images and sound should match up.

Adjusting Individual Tracks
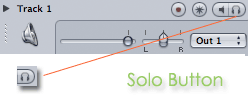
Mute and Solo Buttons
The Mute button silences the chosen track and keeps all others playing.

The Solo button silences all tracks except for the chosen track.
Pan Slider
The Pan slider controls the pan position, meaning the left-to-right placement in the stereo field.

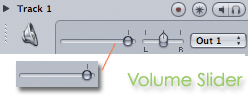
Volume Slider
The Volume slider adjusts the volume (loudness) of the chosen track in relation to other tracks.
Effects
The Effects button opens the Effects window. This window provides multiple options for altering the chosen track. To apply an effect, find it in the Effects window list and double click on the name. The color of the Effects button changes when an effect is applied to a track. The best way to learn what these effects do and how they'll sound with a particular audio clip is to experiement.

Tutorials, Books, and other Resources
The Design Center has a number of manuals and books for using Soundtrack and Soundtrack Pro for audio projects. These include manuals bundled with the software and the following:
- Apple Pro Training Series: Soundtrack
- Podcasting Solutions: The Complete Guide to Podcasting
- Sound for Digital Video
Online Tutorials and Resources
- Apple Soundtrack- Music to Video Editors' Ears
illustrated articles covers the benefits of using Soundtrack, and provides an overview of the interface and the application's basic sound editing features. - Let There Be Music: Getting Started with Soundtrack
Another, more in-depth illustrated tutorial with downloadable sample files.
- Podcasting with Soundtrack Pro
Covers hardware, software, and why you'd want to create a podcast.