DreamWeaver
4 Project
Created October 20, 2000
Modified: March 10, 2002
Purpose
The purpose of this project is to get you familiarized with DreamWeaver, a web
page/HMTL editor. Thi project will introduce you to cascading style sheets,
making e-mail links, creating tables, and making image maps. The bonus project
is a quick method of making rollover links.
Platform
This project can be done on both the Mac and PC sides.
WARNING: for all parts of this project to work, all the files associated with
it need to be in the same folder on the G or Groups drive, preferably inside
your public_html folder. I highly recommend that, once you open DreamWeaver,
you do a save as… to your home directory in a folder called DreamWeaver.
Then copy all of the graphics and any other files you intend to have the page
use or link to in the same folder. As you place these things into the web page
in DreamWeaver, it will link directly to that file and not plant internal links
to other folders in your home directory. If you do not do this early on, the
page will not open correctly for your instructor from the G drive. Test it once
it is turned in by having someone else signed onto a computer in the CCLI open
the page from the G drive. If it works for them, it is all right. If not, correct
the code, move the other files, do whatever you need to do to get it to work.
Steps:
- Open up DreamWeaver.
It is on the local applications for the Macs and under Start>Programs>HTML
editors>DreamWeaver on the PCs.
- One of the first
things to do when opening DreamWeaver to work on a new or existing page, especially
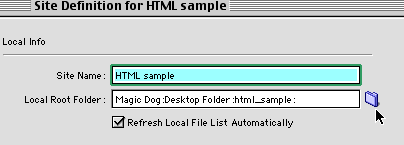
if it is part of a larger site, is to go to Site>Define Site>New.
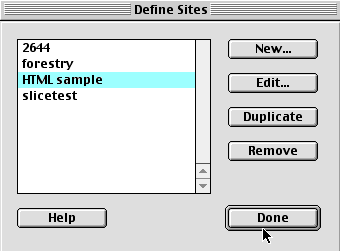
This function allows you to specify a Site Root Folder (where all of your
files will be located) and creates a Site Cache (which will allow you to link
documents relative to this folder rather than having to specify its complete
address.) It is also supposed to let you make updates to all of the pages
in your site through a single command. Give your site any name and then in
the "Local Root Folder" box, click on the folder icon and navigate
to the folder that will hold all of your site's files. Click once on this
folder and then click "Choose", not open, when you find it. Once
you click OK, DreamWeaver should show you a listing of your site's Cache.
- After closing
the Site box, look at the various windows that have opened with the program.
These should look fairly familiar to you by now. The terminology is similar
to other programs we have used. The long narrow palette on the left side of
the screen is called the Objects Window. Clicking on the various icons provides
you with a shortcut for inserting things such as tables, email links, and
images into your Web page.

The long narrow palette at the bottom of the screen is called the Properties
Window. The tools here allow you to format text, create image maps, and make
changes to the size and shape of tables. As with many of the other programs
we have used, this palette provides only one of several ways of doing the
same thing (most of these options are duplicated under the "Text"
and "Modify" drop-down menus at the top of the screen.

The Launcher Palette may or may not be open, but these icons are also repeated
on the bottom of the document window. They look like this:

These icons allow you to do various things such as view the HTML code, create
style sheets, or view a listing of all the files in your site.
- Click on HTML
Source and a window opens that will show you the code that is generated by
the program. Look at the code that already appears even though you haven't
even put something into the blank window. Why would it be there? What does
it say or do?
Cascading Style Sheets: Click on CSS Styles icon at the bottom of the
screen (it's the round one with an "S" in the middle) or get the palette
from the Window menu at the top of the screen. This will allow you to define
styles for your pages. A window will open that says (none).
- Click on the
icon with the plus sign on it in the bottom right corner. A window appears
that asks you to name your style. Call this one Headline and then click OK.
- A second box
will appear asking you to save your Style Sheet. Place it in the same folder
as the rest of your HTML files.
- Another box
appears that allows you to say how big you want the text, what color, what
font family, and if you want it italic, bold, etc.. Define it anyway you want.
- Define another
style as Subheading. Then define two more types of fonts as text and quote.
Make each one different in size, color, and style.
- Now type some
text on the screen. If you highlight the text, and then click on a defined
style, the text will take on the attributes you defined in the CSS style.
What good is this? If you have hundreds of pages on a web
site and someone wants you to change the color of the text, you can redefine
the CSS style and all the text that has been designated under that style will
automatically change when you open the files under DreamWeaver. Have examples
of all four of your defined text styles on your page.
Making an Email Link: This
couldn't be much easier.
- Type out your
email address at the bottom of your page.
- Highlight it
with the cursor.
- Click the icon
on the Objects palette that looks like an envelope (fourth from the top in
the right column).
- Be sure that
both blank spaces in the dialog box that pops up contain your address.
- Your email address
should now be underlined on screen. Place the cursor over it and the Link
box in the Properties palette should say mailto:jasheppa@mtu.edu (but obviously
with your address in it).
Creating Tables:
Since HTML is fairly restrictive in how you can arrange text and images on a
page, Tables have always been an import tool for designers. While they are useful
for displaying organized sets of information (such as the schedule for this
course), they can also be used without their borders turned on to create more
appealing designs. Tables allow you to create a grid of Cells using Rows and
Columns (just like in Excel). Creating tables can be tedious for most people,
so a program like DreamWeaver is wonderful for people who don't like to toil
in code.
- To create a
table, begin by clicking the grid icon on the Objects palette A dialog box
like the one below will pop up, prompting you to specify the particulars of
your table:
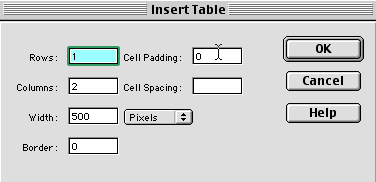
- For Width, you
can specify in a set number of Pixels, or you can set it to occupy a a given
percentage of the screen. Setting as a percentage guarantees that your viewers
will always be able to see all of your table (though in an elongate form).
Setting in pixels means you maintain more control over how your layout looks
and the burden for seeing all of it falls on your viewer and her scroll bar.
- If you set the
Border to 0, it will show up in black dotted lines in DreamWeaver to show
you its boundaries, but will not be visible when displayed in a browser. Each
size (1, 2, 3, etc. is equivalent to a pixel).
- Cell Padding
is the amount of space between the walls of the cells and the content within
them.
- Cell Spacing
is the amount of space between cells.
- Your page should
contain a minimum of one table, but I leave its design and content up to you.
Inserting and
Manipulating Images: Go to Insert>Images or click on the Insert Image
icon in the upper left corner of the Objects Palette Choose a gif or jpg from
your files in the dialogue box. Be sure these image files are saved in the same
place as your HTML file. The image will appear on the screen.
- Click on the
picture and the Properties box at the bottom of the page will show the attributes
of the image.
- Now you will
create an "Image Map" so that users of your page can link to another
page by clicking on your image. Click on the downward arrow on the bottom
right hand corner of the Properties box. It expands to show some mapping options.
Now you must decide what shapes your map needs to be divided into: rectangles,
circles, or polygons to be determined.
- Click on the
appropriate shape and return the cursor to the graphic. Click where you want
to start defining your mapping shape. The method for the rectangle and the
circle is to drag-and-draw. For the polygon, click along the edge of the shape
and it will appear as you go. (Remember geometry: two points are a line, three
points are needed to define a triangle, etc. The area will grow as you mark
more points.)
- Once the area
is defined, go back to the Properties box. In the link box, type the URL you
want this area of the map to link to or choose another of your files by clicking
on the little folder icon.
- You may also
choose a target from the list. A target tells the browser where to open the
image. For example, if you want your original page to stay open while the
link appears in a new window, you can choose "_blank" as the target.
These options are often more helpful if you are using Frames.
- In the box called
ALT type in a name for your image that will appear on the screen if (a) the
graphic doesn't open, or (b) the cursor sits on the graphic map area.).
Previewing your work in a Browser:
- Push the F12
button on the top of the keyboard or go to File>Preview in Browser>Netscape
(or Internet Explorer). This will open a browser (Netscape for us) in which
your map appears. Test the area you defined to see if it works. If not, check
each step to find the problem.
- Repeat these
steps for each new area on the map, checking it via the F12 button as you
go. Be sure the whole graphic is mapped with a minimum of four links.
TIME OUT:
Look at the HTML Source box. What is happening to the code? What kinds of code
has DreamWeaver created to handle your image maps? Notice that if you highlight
something on your working screen that the corresponding code will also be highlighted,
a very handy feature. You can also set DreamWeaver to change the color of the
code and tags so that they are easier to distinguish from the actual content
of your page.
Inserting Movies: In the he eighth row down of the Objects Palette, there
is an icon for inserting movies into your page. On the left is one for inserting
a Flash or Director ShockWave movie (an .swf file). Keep this in mind for later
in the term when you have completed these assignments.
Turn In:
When you turn in the file, be sure you put the linked pages (if they
are internal links) into the same turnin folder so that the map will work for
me, too. Do this by copying the entire DreamWeaver folder from your home directory
onto the groups drive.
Points:
On Time...10
Followed the steps...60 (Four sizes and colors of text, an email link, a table,
and an image map with four links)
Instructor's Discretion...15 (Points will be awarded for evidence of creativity
or time spent learning additional features)
Subtotal...85
Bonus: create mouseover links.
- To do this bonus,
you will need four pairs of images that are approximately the same size. You
can create two versions of a simple text button in PhotoShop like the one
below, or you can use other drawings or photos:

- Create a new
DreamWeaver document.
- Go to Insert>Interactive
Images>Rollover Image.
- In the Image
box, click on browse button next to 'Original Image' and find the
one you want to appear first.
- Then repeat
for the 'Rollover Image.'
- Fill in the
'When clicked, go to URL' text box. This is the page the link goes
to.
- Repeat these
steps until you have four rollover graphics that are links.
- Turn this as
bonus.html (along with the linked files if they are different from those in
the first half of this project).
Points:...15
Total...100
Return
to Schedule