
Getting to Know a Mac
If the computer
is already on and a login box appears in the middle of the screen, enter your
user name, in the "Login" box, then hit tab and enter your "Password"
in the next box. Click "Continue."
If the computer is not on, turn it on by pressing and holding (for about 3 seconds)
on the round key on the upper right-hand corner of the keyboard (it appears
with a tiny arrow in it). Although it may take a moment, the machine should
start up. If the monitor is not already on, switch it on using the power switch
on the front of the monitor.
If the computer is on and you can see the desktop (i.e., no login box appears),
someone else is already using the machine.
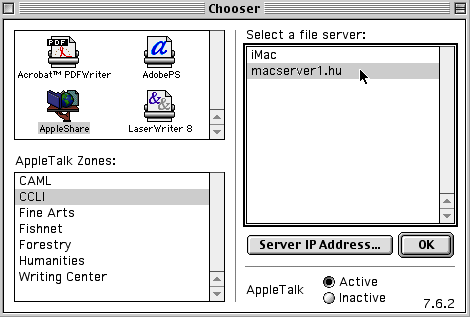
If you login and do not see the Tranfer and Groups drives or your home directory, then click on the rainbow apple icon in the upper left-hand corner of the screen and drag down to "Chooser."


The icons for the drives should appear on the desktop within 5-10 seconds.
In this example, I used Adams.
The Adams icon is the icon for the computer itself. This icon should appear
without having to use the Chooser at all, but there's not much a user can do
with this drive.
The Temp Storage icon is the icon for a temporary space on the computer.
You may save files here, but they will only be available on the computer you're
working at.
The CI Classes icon is the icon for computer-intensive classes. You shouldn't
have to use this drive at all.
In this example, I chose to select the Applications, the Groups, and the Transfer
drives to use. These -- and the other drives available on the Mac side of the
lab -- are explained below.
Drives You Need to Know About
Applications is where all the applications or software is contained,
separated into folders with descriptive labels (e.g., "Web Stuff").
Groups is a "shared" drive and is accessible by anyone, either
on the Mac or the PC side. Many of the files you'll be asked to retrieve and
use are found on this drive. Once a file is saved to the Groups drive, it cannot
be changed. The Groups drive, much like the Transfer drive, is accessible from
both the PC and the Mac sides of the lab. The Groups drive, however, is a much
more permanent space (the Transfer drive is automatically cleaned out -- everything
is deleted -- once a week, while the Groups drive is not automatically cleaned
out).
Home directory represents a user's home directory. This is a private
space accessible only to you -- only you can save and delete files in this area.
This drive should automatically show up when you log onto the computer using
your user ID and password. Your "public_html" folder (where all your
Web pages should be saved) is contained within this drive.
Transfer much like the Groups drive, is accessible from both the PC and
the Mac sides of the lab. The Transfer drive, however, is not a permanent space
(the Transfer drive is automatically cleaned out -- everything is deleted
-- on a weekly basis, while the Groups drive is not automatically cleaned out).
This is a useful space for sharing files with others in the lab.
Disk Drives (floppy and zip): The icon for a disk only appears after
a disk has been inserted into either the floppy drive or the zip disk drive
on the front of the computer (built into the "tower" of the computer).
A few of the machines have external zip drives. Users can retrieve files from
and save files onto floppy and zip disks. Note: The machines with blue and gray
hard drives (towers) do not have floppy drives. Buy a Zip disk for this class
and get used to using them.
They allow you to store 100MB of material and are much sturdier than floppy
disks.
CD Drive allows you to get materials from a CD, listen to music, or use
pieces of multimedia. Two machines have internal CD burners which allow you
to save data to a CD one time.
Ejecting Disks- To remove a zip disk or CD from the machine, close all
files for that disk and drag its icon to the trash or highlight the icon by
clicking once and go to File>Put Away.