Manipulating
photos Using PhotoShop- Part 1
module last modified: February 10, 2002
PhotoShop 6
PLATFORM
You can do the first part of this module on either the Mac or the PC side. Some
steps are slightly different depending on the platform you are using, and those
steps are marked below.
PURPOSE OF THIS MODULE
If you are not careful, this module will have you living in the lab... not because
it is difficult, but rather because it is fun: this program is exceedingly versatile
and if you are creative or you want to be creative, you will love the software
you learn in this module. This module introduces you to PhotoShop; in it you
will learn how to:
- add color to
a grayscale scanned image
- make images
look crazy in all sorts of fun ways
- make a scanned
image look like a piece of art using quick mask brush strokes
WHAT YOU WILL BE MAKING
In this module, you will be modifying an image you scanned in an earlier project,
in order to make the following 1 image.
- one greyscale-but-colorized
version of your scan
Using PhotoShop to add color to a gray image
- Open PhotoShop.
Find PhotoShop 6.
On the Mac it will be under the apple in the upper lefthand corner, then under
local applications> Adobe PhotoShop 6.0.
On the PC it may be under start>programs>graphics and drawing>...
When PhotoShop is open, you will see that the menu bar has changed, and that
there is a Tool palette open. On the Macs, if you click on the screen, you
may take yourself outside of PhotoShop (you won't see the Tool palette). If
this happens, go up to the little icon at the top right of the screen, and
pull down to select "PhotoShop"; this will put you back into PhotoShop.
When you open PhotoShop, there might also be other palettes open; don't worry
about them, you can close them if you like (by clicking on their close boxes
in the top left of their windows). The one palette you do want for now is
the Tool palette, which looks like this (It doesn't matter which tool is highlighted)---->

- Use the "Open..."
command under the File menu to open one of the images you scanned for the
last module.
- Before you do
anything else, choose "Save a Copy..." from the File menu.
A dialog box will appear, in which you can type a new name for your image.
This is a way of making a copy of your document to work on, so that you don't
have to worry about messing up your original image.
Type in a new name for the document (anything you want, or you could just
add "2" after the original name), and then click "Save".
Don't worry if a dialog box with some different options for saving your image
appears after you click "Save"; just click "OK".
- Go up to the
Image menu and then select the Mode submenu, and hold the mouse down over
it so you can see what items are in the menu.
Choose "Grayscale" from the submenu. A dialog box will appear, asking
if you want to "Discard the color information;" click "Okay."
You are removing all the color from this image so that you can learn to use
PhotoShop by re-coloring it (this may sound weird, but, it will make sense
as you move on)
- Go back up to
the Image menu, and choose RGB from the Mode submenu.
You won't see any changes happen to your image when you do this, but, if you
didn't do this, PhotoShop would only let you add different grays to your image
after you had converted it to grayscale; now you will be able to add all sorts
of colors, and your fun and exploration can begin.
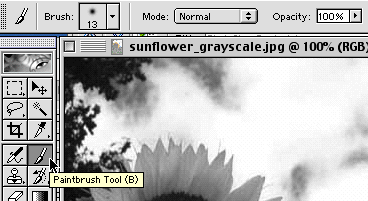
- Choose the Brush
tool from the Tool palette that opened when PhotoShop opened.
The Brush tool looks like this:

- Notice that
the ribbon menu just below the drop-down menu words has changed. The settings
on this ribbon bar allows you to change the brush size and kind, the mode
in which the brush paints, and the degree of opacity for your "paint".
This bar looks like this:----->

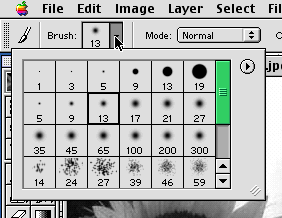
- Use the small
black arrow for the "Brush" setting to open a drop-down pallet.
Select a medium (9-19 pixels) brush.

- Use the "Opacity"
slider in the ribbon bar to set the opacity at about 50%. (Just hold the mouse
down over the little white arrow, and move it back and forth; release the
mouse when you have the slider where you want it.)
Opacity determines how the color you choose (you'll do this next) covers your
picture: 100% opacity means that if you were painting with green, the green
would completely cover your image, and you couldn't see through it; 1% opacity
would mean you could barely see any color being applied.
- Also, in the
ribbon bar, make sure that the drop-down menu for mode is set to "Normal".
After you have painted for a while (following the steps below), try experimenting
with different options under this pop-up menu.
- Now, it's time
to choose a color to paint with. In the PhotoShop tool palette, click once
on the black square towards the bottom of the tool palette:---->

NOTE: The square on your screen might not be black; it might be some other
color. It doesn't matter, just click once on the square that corresponds to
the black square in the image above.
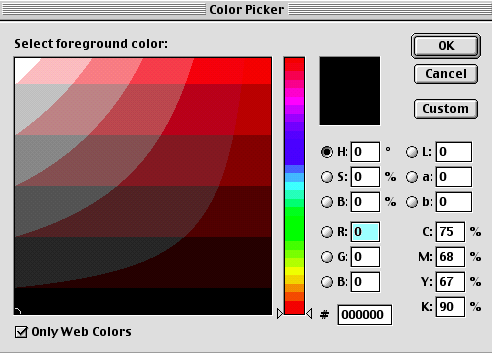
This will bring up a new, large dialog box, the "Color Picker" dialog
box, in which you can select from thousands and thousands of colors. The next
illustration shows how this dialog box looks.

- To choose a
color, ignore all the number stuff on the right side of the box (that's for
when you know the different colors well enough that you can specify them by
numbers the computer understands).
In the middle of the box, there's a long vertical strip with different colors
in it. Hold the mouse down over the little white arrow sliders, and move them
up and down. As you move them, you'll see the great big box of colors to the
left change: this is how you change the range of colors you can select from.
Note the check box for "Only Web Colors" at the bottom left. Deselecting
this will give you access to millions of colors, rather than the 216 specified
for use on the Web. For the purposes of this module, you don't have to stick
with Web-Only colors.
- When you have
a range of colors you like in the big box on the left, click somewhere in
that box. The color you have selected will appear in the small box at the
top right of the dialog box.
Click "OK" when you have a color you like. The dialog box will close,
and the color you selected will now be in the small square you clicked to
get the Color Picker (under step 11 above).
- Now, start having
fun. Using the Brush tool and add color to your picture.
You can select a new color any time you like, and you can play with the brush
sizes and the opacity of the colors (in the Brushes window), just explore
a bit.
Remember to choose "Save" from the File menu to save your work,
if you like what you are getting.
If you do something you don't like to your picture, choose "Undo"
from the Edit menu. This will only undo the very last thing you did, if you
have clicked somewhere on screen, you won't be able to undo what you last
did. [The latest version gives you a 'history' of what you have done. Experiment
with it if you go further with your picture than you would have liked. You
can get this window going to Window>Show History]
If you do a whole lot of things you don't like, choose "Revert"
from the File menu: this will return your picture to the state it was in when
you last saved it.
- To work close
in on detail in your image, click the tool in the Tool palette that looks
like a magnifying lens; it is the last tool on the bottom right of the Tool
palette, just above the color selection boxes.

Click anywhere on your image with this tool, and you will zoom in to your
image.
You can keep clicking until you have magnified the image up to 1600%: the
level of magnification will be recorded in the title bar of the window.
When the image is magnified, you can click on any of the tools in the Tool
palette to use them.
When the image is magnified, use the scroll bars around the image's window
to move around the image, or hold down the space key, click and hold the mouse
on the image, and move the mouse to move the image.
To zoom back out to see your image at 100% size, choose the Magnifying tool
again, but now hold down the Option key (on the Mac) or the Alt key (on the
PC) and click on the image until it returns to its original size.
- Make the picture
be as colorful and neat looking as you can.
Just adding a few blobs of color to your image won't earn you full points:
I want to see you colorize your image carefully. You don't have to end up
with anything realistic-looking, but I do want to see that you learned how
to change brush sizes & opaqueness, and how to get in close on some detail.
- Save your image,
and then turn a copy in to me, to show that you understand the very basics
of PhotoShop: Save the image as a PICT or TIFF file. If you are working on
the Macs, save the file to your folder in the "MacTurnin" folder
in our class folder on "Groups." If you are working on the PC side,
use your folder in the "PCTurnin" folder on the G: drive.
TURNING IN YOUR WORK
Turn in all files electronically on or before the due date.
POINTS
Turned in on time..........10
Image 1 (Colorized- This Assignment).......20
Image 2 (4 filters- PhotoShop Project 2).............20
Image 3 (masked- PhotoShop Project 2)............20
Instructor's Discretion....15
Basic points...............85
Bonus Tasks (see bottom of PhotoShop Project
2)
Bonus Points............15
Total Points...........100


