Using
Eudora for E-mail
This part is for catching up. There are only a few points for this module, but
you must know this module to work with email in the lab.
PLATFORM
You can do this module on either the Mac or the PC side of the CCLI. Some steps
vary depending on the platform, and those steps are marked below. I highly encourage
you to do it on both sides of the CCLI because you will be using both sides
of the lab. It will be much more convenient for you in the long run to be able
to check your mail, etc., on whichever platform is available or that you are
working on for the project at hand.
PURPOSE OF THIS MODULE
This module will have you setting up a personal e-mail account using Eudora,
an e-mail application. You will:
- set up your
own account
- create your
own signature (this will be a part of every document you send)
- create and send
a message to someone (the instructor)
The consultants can help you with these procedures and there are undoubtedly
lots of people in class who know how to do these things already, so ask them
for help too.
NOTE!!!!!
This module has 2 sub parts, both of which must be completed.
The Netiquette
Assignment can be found in part 2.
STEPS
Part 1
Follow
the Apple steps if you are working on the Macs; follow the PC steps if you are
working in Windows.
GETTING STARTED
Apple
- Log in to a
Macintosh in the usual way. Double click on applications and then open the
folder entitled "E-Mail".
- Open the prototypical
mail folder in your home directory.
- Then, double-click
the "Eudora Settings" file, to open Eudora.
It might seem, once you have opened Eudora, that nothing happens. But watch
the menu bar: you will notice that it changes (it should say FILE EDIT MAILBOX
MESSAGE TRANSFER SPECIAL WINDOW). If the menu bar doesn't change, double-click
the "Eudora Settings" file again. Also, try holding the mouse down
over the icon at the top right of the screen; if, in the menu that appears,
you see "Eudora", that means Eudora is open>select that menu
option, and the computer will take you into Eudora; just watch the menu bar.
PC
- Double click
on the Eudora icon from the Start menu. This will start up the application.
- You will be
asked to enter your current password. Do so.
PERSONALIZING YOUR COPY OF EUDORA
Now you will personalize this copy of Eudora so that the network knows who you
are so that it can send you your own mail (this is like putting your name on
your mailbox at home so the mail deliverer knows where to put your mail).
Apple
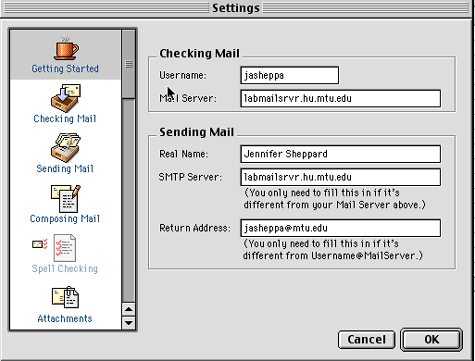
- From the Special
menu choose "Settings...".
- On the left
side of the window that opens, click "Getting Started".
- Under "POP
account", change "userid" to the name you use to log on (i.e.,
your userid). For example, in my account, that line says "jasheppa@mail.hu.mtu.edu".

- Under "Real
Name", delete "your name" and type in the name you would like
to appear in other people's mailboxes when they get mail from you. (You can
type in the name your mother knows you by best, or your dog, or your best
friend,or the name you would like to be known by)
- Now you will
copy your userid so that you can enter it in the other places that require
this information: use the cursor to drag-select the name you entered for your
POP account (click the cursor in front of your name, then,while holding the
mouse down,drag over to the right until your name (but NOT "@mail.hu.mtu.edu")
is highlighted.
Go up to the Edit menu at the top of the screen, and choose "Copy".
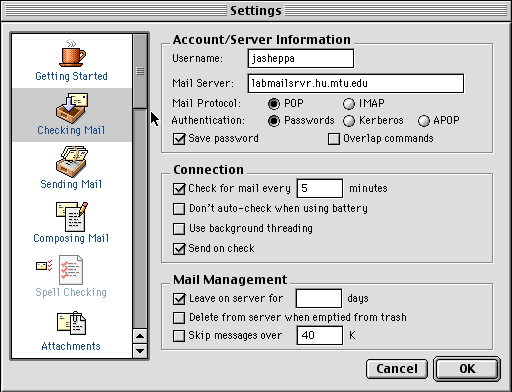
- Click "Checking
Mail " on the left side of the Settings window.
What appears to the right of the window will change. Insert your Username
as below:

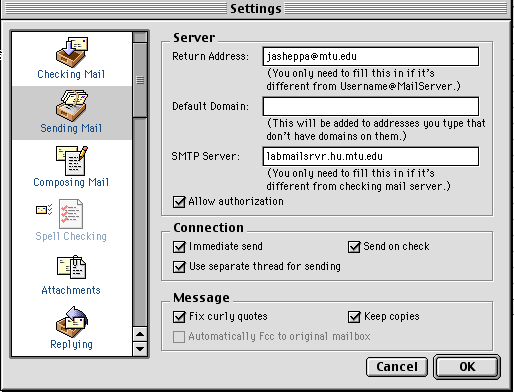
- Click on "Sending
Mail" and insert your return address as below:

PC
- From the Tools
menu choose "Options" Then choose "Getting Started" from
the icons in the left frame.
- Under "POP
account", change "userid@mail" to the name you use to log on.
For example, in my account, that line says "jasheppa@mail.hu.mtu.edu".
- Under "Real
Name" type in the name you would like to appear in other people's mailboxes
when they get mail from you. (You can type in the name your mother knows you
by best, or your dog, or your best friend,or the name you would like to be
known by·)
- Under "Return
address" change the username to be your user name. For instance, mine
would be:
Return address: jasheppa@mtu.edu
- Click OK. IF
you are prompted for current password, enter it and then click ok
MAKING YOUR
SIGNATURE
In e-mail terms, a signature is a file that always appears at the end of every
message you send. You can put anything you want into this file (that is, any
thing that you can enter from the keyboard, such as your name & e-mail address,
or a favorite quotation, or a picture made out of the letters of the alphabet.
As you receive more and more e-mail, you'll see what different people use for
their signatures.)
Apple
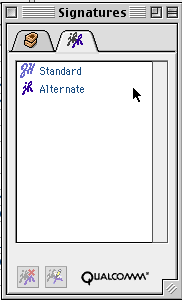
- Click on Window>signature.
In the window that pops up, double click on "standard":

- This brings
up a window where you can type in anything. Whatever you type here will show
up at the end of every message you send... most people put at least their
name and e-mail address here (your e-mail address is your log in name, followed
by "@mtu.edu"). Some people add a favorite quotation, some people
make a picture with letters. Try something here, and then send yourself a
message to see how it looks. (Follow the steps below to create a message,
and put your e-mail address in the "To:" space.)
- Close the Signature
window by clicking its close box (this is a standard feature of Macintosh
windows: it is the small box at the top left of the window).
If you typed anything into the window, you will get a dialog box asking you
if you want to save what you typed. Click "Yes",this will ensure
that your signature will appear on the mail you send.
PC
- From the Tools
menu choose "Signatures" and then "Standard".
- This brings
up a window where you can type in anything. Whatever you type here will show
up at the end of every message you send... most people put at least their
name and e-mail address here (your e-mail address is your log in name, followed
by "@mtu.edu"). Some people add a favorite quotation, some people
make a picture with letters. Try something here,and then send yourself a message
to see how it looks. (Follow the steps below to create a message, and put
your e-mail address in the "To:" space.)
- Close the Signature
window by clicking its close box. (This is a standard feature--it is the small
box with an x in it at the top left of the window.)
If you typed anything into the window, you will get a dialog box asking you
if you want to save what you typed. Click "Save",this will ensure
that your signature will appear on the mail you send.
SENDING A MESSAGE
These steps are the same whether you are working on a Mac or a PC, except for
steps 5 and 7.
- Choose "New
Message" from the "Message" menu.
A window for you to type your message will appear.
- In the "To:"
line, type the email address ("jasheppa@mtu.edu") of Jennifer Sheppard
who is the instructor for this class in the Spring Semester, 2002. Use the
tab key to move downward in the title window.
- In the subject
line, type the subject of your email. (You must always enter a subject any
time you create a message; you can name it anything you like, but you should
name it properly so that the person knows what your message is about.)
- Click the cursor
below the dotted line, and type your message.
Write to the instructor about your experiences with computers. What kinds
of things do you know how to do and how did you learn them?
The instructor wants approximately 250 words from you on this.
- Depending on
the system you're using:
Apple: When
you are finished composing your message, click the Send button at the top right
of the screen. You will see some dialog boxes that show you the progress of
your message. When those dialog boxes disappear, your message is on its way.
Should the button at the top of the new message say 'Queue' instead of send,
go to File>Send Queued Messages. Otherwise, you have to queue your messages
and then send them all at once before you can quit Eudora.
PC: When you are finished composing your message, click the 'send' button
at the top of the new message. When those dialog boxes disappear, your message
is on its way.
Should the button
at the top of the new message say 'Queue' instead of send, go to Tools>Options...>Sending
mail and click 'Immediate send.' Otherwise, you have to queue your messages
and then send them all at once before you can quit Eudora.
If you have never used Eudora before, you will probably receive a message asking
you to register for a free newsletter. Feel free to click on "never register".
The request should not show up again.
- In a day or
two, come back into Eudora, and check your mail. The program should automatically
tell you if you have mail. If you are already in the program and want to check
your new mail, you can also click on the icon with the red checkmark.
If you have a response from me, you will see my name, the date and time the
message was sent, and the subject of the message. Double-click on this line,
and my response to you will appear.
- To delete messages
before or after you have read them, click the trash icon.
- Eudora checks
for mail by connecting with the MTU mailserver (mtu.edu) and downloading the
messages that are on the server. The mailserver is a computer that receives
all the email that is sent to an account at MTU.
If you plan on using Eudora in conjunction with other email software programs
(at home or in other labs, for example), you should set Eudora to keep your
messages on the server even after you have downloaded them onto your account.
To adjust your Eudora settings to keep your mail on the server:
Apple: Choose "Settings" from the Special menu. In the dialog
box that pops up, click on "Checking Mail" in the scrolling area
on the left side of the box. Make sure that the boxes next to "Leave
on Server for" and "Delete from server when emptied from trash"
are checked. Then click OK.
PC: Choose "Options" from the Tools menu.. In the dialog
box that pops up, click on "Checking Mail" in the scrolling area
on the left side of the box. Make sure that the boxes next to "Leave
on Server for" and "Delete from server when emptied from trash"
are checked. Then click OK.
- FURTHER NOTES:
Explore the other options in the Settings window on the Macs or the Options
window on the Windows machines. Through these options, you can control how
you get alerted when you get new mail (as in, you can turn off that annoying
sound) and the fonts you use to see your mail and messages.
Also, if you would like to more economically and efficiently store your mail,
try making storage areas by going up to the mailbox menu and down to "new".
Name your various mail boxes as you choose; for example, have one for school
related messages, one for email from friends, and one for email from Mom and
Dad. If you want to further organize, you can place these mailboxes into a
few overarching folders by clicking the box next to "Make it a folder".
You can then drag your existing mailboxes into this new folder.
Also, add my email address to your address book. Click on the green book icon
at the top. In the bottom left corner of the dialog box that appears, choose
new. Call me whatever you want ('HU2644 Instructor' would work best), and
then click OK. Now type my address in the large white space on the right side
of the new box that appears. Then when you want to send me a message, just
click on the address book and double click on the nickname you gave me. A
new message window will appear with the address already installed. Cool, eh?
Part
2
In this part, you will learn a little about the etiquette of using e-mail.
- Go back to the
Class Schedule in my web page and you will see
that there is a link titled "Netiquette."
Please open and read the "Netiquette" file (you can read it on the
computer, or print it out, it's up to you, depending on your reading preferences).
- Please now send
me an e-mail message (to: jasheppa@mtu.edu),
with a subject line of your choosing, in which you describe what you understand
to be the four most important things about using e-mail with good will and
thoughtfulness towards others.
Points..................10
for sending the Netiquette message.
Return
to Schedule


