Basic
Skills to Survive in the CCLI
module last modified: January 5, 2002
Part one
Introduction to the CCLI
In order for you to perform in our lab, [if you do not already have a CCLI account]
you must do this portion of the assignment.
Purpose of this part:
This module should make you comfortable logging into and working in the CCLI.
To do your best work on future academic and work-related projects, you should
be equally comfortable with the PCs as with the Macs. You will:
- learn how to
log in & select directories you need
- learn about
using the mouse
- learn about
typing on the computer
- learn about
saving files
The consultants
can help you with these procedures and there are undoubtedly many people in
class who know how to do these things already, so ask them for help, too. If
you are new to the CCLI, you might want to hold onto these pages for future
reference. Try to take some risks and try some things on your own, but don't
ever hesitate to ask for help.
STEPS
LOGGING IN
"Logging in" is the process you use to connect to the computer network
in the CCLI. If you were working on your own computer at home, you wouldn't
need to do this. But, because there are many different people using the CCLI,
each person needs a place to keep her own individual work.
"Logging in" gives you access to your own space on the network,
and to all the software tools available in the lab.
- Go to any Computer
located in the CCLI.
- You should see
a new dialog box.
In this box you will enter your log-in name and password. [There will probably
still be the log-in of the last person to use this particular machine if you
are on a PC. Delete their log-in and type in your own.]
Your log-in name is generally your first initial, middle initial, and
first 6 letters of your last name (if it has 6 or more letters), all in lower
case. If this combination of letters does not work for you, ask the consultant
to check your log-in name: sometimes, if your name is similar to someone else's
on campus, the network administrator will give you some other variation of your
name.
Your password is your Social Security number, minus the last digit. You
will learn how to change this password for security purposes at the end of this
module.
Use the mouse to move the arrow on screen so that it points inside the top rectangle
in this dialog box. Click once. Type in your log-in name. Type in all lower
case, with no spaces.
Use the mouse to move the arrow on screen so that it points inside the bottom
rectangle in this dialog box. Click once. You can also use the "Tab"
key on the upper left of the keyboard to move the cursor from the Login box
to the Password box. Type your password. Dots will appear on screen, instead
of numbers, so that no one looking over your shoulder can learn your password.
Click on the button that says "Continue" or press enter.
The desktop will pop onto the screen. It should contain several folders including
your home directory,(on the Mac side, this is signified by having your userID
under it, on the PC side, it is called 'home directory'), an applications folder,
and others.
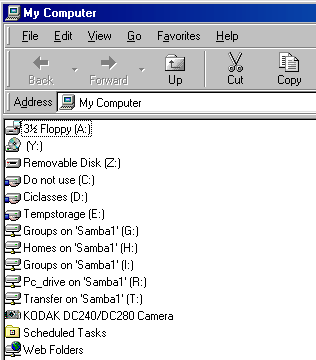
On the PC the "Groups" drive is directly accessible from the
desktop. Double click on the computer icon at the top left of the desktop and
a window like this will appear:

Both the Groups
drive and your Home drive are accessible from here.
To find the class folder, follow these steps:
- On the Mac,
(if the Groups Drive is not already on the desktop) click down on the colorful
apple in the upper left hand of the screen. Keep holding down the mouse, and
move the mouse down over the menu until the word "Chooser" changes
color (this is called "highlighting" something).
- Lift up the
mouse button, and what is called a "dialog box" will appear on screen.
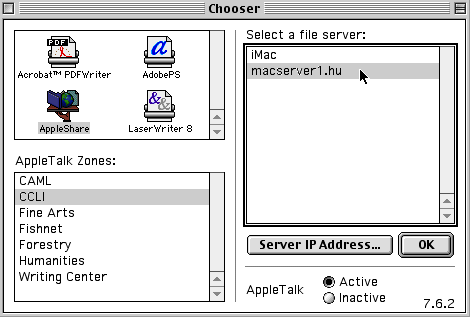
It should look like this:

- This particular
dialog box is called the "Chooser" because it allows you to choose
which networks to open and to which printer your work is sent. For now, you
will set up the Chooser to get to the CCLI network.
- Click once on
"AppleShare" in the top left corner of the Chooser. Then, click
on "macserver1.hu" in the top right (it may not say exactly this,
but it will say something with "macserver1.hu" in it). When you
are finished, the Chooser should look like this:

- Click on
the "OK" with the mouse button.
- Yet another
dialog box will appear. Use the mouse to click "OK".
- In the new
dialog box, choose the "Groups" directory. This is where you
can find the turn-in assignment folder and the class modules. Click once
on Groups.
hint: If you need to select more than one application (i.e., if Applications
and Home Directory are not already open), you can do so by holding down
the shift key while you choose each option.
- Click "OK".
- The dialog
boxes (except for the Chooser) will disappear, and three directories will
appear to the right of the screen. You can close the Chooser by clicking
on the upper left hand of the box.
You are now logged
in and have the correct fodlers available for this class. Congratulations.
GETTING SOME PRACTICE USING THE WINDOWS ON THE PC.
- Click on the
"Start" button at the bottom left of the screen and click on "Help".
A window like the one below will pop up:

- Click on the
"Introducing Windows 98" and the "Exploring Your Computer"
icons and skim each of the help files so that you will know your way around
the Windows environment.
CREATING YOUR OWN PASSWORD
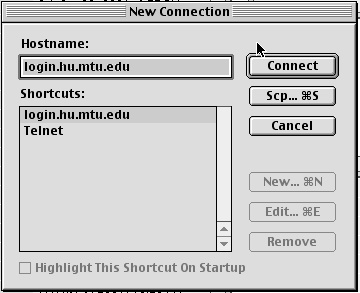
- Find Telnet.
For the Mac, it will be in Macintosh HD>Applications>Nifty SSH>NiftyTelnet
1.1 SSH r3. On the PC it will be under the "Start" menu. Open Telnet
and click on "connect". A window will open and ask you for a host;
type in "login.hu.mtu.edu"
- You are now
in the operating system called UNIX (click here
for more info on UNIX commands). You want to login in the same fashion
as when you initially entered into the CCLI system. (This means typing in
your first and middle initial, followed by the last six characters of your
middle name. Hit return. Then use the first eight digits of your social security
number as your password.)
- You will
see a prompt that looks like this:

- At the prompt,
type "passwd" and hit return. Then next prompt will read "Enter
login (NIS) password." Here you will type your old password.

- At the "new
password" prompt, type in a six letter password of your choice that includes
at least one number. Make sure to chose something that you can easily remember
and write it down somewhere just in case you forget.
The system will ask you to retype your new password for verification. Do so.
You will receive verification that your password has been changed. At the
next bold prompt, type "logout." That's it! [It may take some time
for the system to change so don't expect the new password to be activated
immediately.]
CREATING FOLDERS
To create a folder, you will be using the 'New' choice from the File menu, but
you must create the folders in the proper place.
- Open the Groups
drive, then open classes>hu2644_Spring2002>PCTurnIn.
A window will open.
- Locate the folder
with your UserID as its name. This is where you will turn in any of the modules
you create on a PC or a Mac!
- Go to File>New>folder.
To save time later, you can go ahead and create subfolders within your named
folder for each assignment. Call them 'Word,' 'Excel,' etc.. The necessary
names can be gotten from the schedule online (look
in the 'Due Dates' column on the right).
- Now go to the
MacTurnIn folder and repeat the process (named folder and assignment folders).
This where you will turn in any assignments you create on a Mac!
- Be sure you
do the same in your home directory. Create a folder called HU2644, then make
a subfolder for each module.
- Note: You should
do all your work out of your home directory. Only use the Groups Drive turn
in folders to submit the final projects.
- Close all the
folders.
SAVING FILES
When saving a file, you must direct where it goes.
- For practice,
open the Word application either from the icon on the Mac desktop or from
the Application folder under the Start Menu on the PC.
- Once it opens,
go to File>Open.
- In the dialogue
box, choose Groups>classes>hu2644>References>Wendell Berry. (This
document will be altered in the third part of this assignment, so save it!)
The link to this file is still directed to the folder from where it was opened.
- Now go to
File>Save As... A dialogue box will open asking where to save this
document. Rename it using "Berry_yourlastname.doc" and redirect
its link to your home directory in a folder called 'Word' in your HU2644 directory.
(Hint: in the box, click on desktop, then your home directory. To create a
new folder there, use the File>New menu again.)
- Now close the
word processing software. (Hint: yes, it's in the File menu again.) You may
want to open your home directory and verify that the file is there.
LOGGING
OUT
On the Mac: Double click on the "Logout" icon on the desktop.
On the PC: Click on the start button and click on the "Logout" icon.
That's it! You are logged out. The computer will reboot to the login window
ready for other users.
FOR FURTHER REFERENCE
Ask the consultant to help you check out the "How Computers Work"
CD from the black CD case in the wooden cabinet. The consultant can also help
you load and play the CD. This CD has lots of general information about how
computers work.
FOR EVEN FURTHER REFERENCE
The black cabinet near the consultants' deskcontains helpful manuals. You can
check out these manuals, by giving the consultant on duty your student ID card.
One manual you will find particularly useful is called "Macintosh User's
Guide". Check out this manual, and look through the different sections.
If you are having trouble with some specific aspect of using a Mac, this manual
can help. (This manual has a white cover, and is usually on the top shelf of
the bookcase.)
Summary:
Make sure you can:
- log on and off
with confidence and grace.
- open documents
from within an application.
- save documents
to your Home directory.
- create your
turn-in folders in both the PcTurnIn or MacTurnIn on the Groups directory.
- save documents
to the turn-in folder on the Groups drive.
- change the name
of a file.
Return
to Schedule


