Using
Adobe Acrobat to Create PDF Documents
Written and
Last Modified January 11, 2002
Platform
This
module can be done on either the Mac or the PC, but some steps will vary as
noted below.
What
is a PDF?
PDF stands for Portable Document Format. Adobe Acrobat allows you to convert
any document, no matter what application it was created in, and no matter what
computer platform you use, into a PDF. This is a compact, standard digital file
format that acurately captures and preserves the look of your original document,
including its fonts, colors, images, and formatting. You can use PDF files for
print documents, as email attachments, over networks or posted on Web sites,
such as the readings for this class. Anyone with the
free downloaded plug-in, Acrobat Reader, can read these documents.
Purpose of this
Assignment
This
assignment introduces you to two ways of creating PDF documents. As discussed
above, PDF format allows easy exchangability between people with diverse computer
hardware and software. It allows your documents to stay true to your original
design and layout. You will learn how to:
- Create a PDF
from a paper document by scanning it into Adobe Acrobat
- Create a PDF
from a digital file by "printing" to the PDF writer.
NOTE: Since there are almost 30 people in class, and you all will be wanting
to use the different scanners this week, you should probably reserve (as discussed
in the Scanning Project Instructions)whichever
computers you need. Try to do all of your scanning at one time so that the scanners
are more available to your classmates.
THIS ASSIGNMENT
HAS TWO PARTS, BOTH OF WHICH NEED TO BE COMPLETED FOR FULL CREDIT
Part 1
- Find a short
(no more than 5 or 6 pages), printed document that interests you to scan in.
For the purposes of this assignment, this could be a magazine or newsletter
article, a paper that you have written, or some other material that you have
created.
- On a Mac,
use the Machine that is attached to the scanner (Jones) and be sure that the
scanner is plugged in and on. If the scanner is not on, turn it on and restart
the computer.
- Open Local
Applications>Adobe Acrobat 5.0.
- Go to File>Import>Scan
- A Window
like the one below will come up. Click "Scan" to begin a new
document.

- On a Mac,
place your document face down on the screen and align it in the upper
right-hand corner.
- On a PC,
use Cather.
- Go to Start>Programs>Desktop
Publishing>Acrobat 5.0
- Go to File>Import>Scan>
- Under "Device,"
use the drop-down menu to select "FotoSnap 32"
- Be sure
that the "Destination is set to "Open New PDF Document"
- On a PC,
place your document face down on the screen and align it in the bottom
left-hand corner.

- On a Mac, a
Pre-scan will run automatically and show you what your image will look like.
Use the cursor to drag a dotted-line marque around the part of the document
you want to scan. Crop out anything you don't want or need because it will
just add to the file size.

On a PC, click "Preview" and your image will show up in the
window on the right.
- Once you have
the marque outline as you want it, you must next determine which settings
and resolutions are appropriate for your document. I've used the settings
below on a Mac because I don't want to include color (which increases file
size) and because I want to create this document for easy printing and readability,
I've used a DPI of 72. I'll leave the choice up to you.
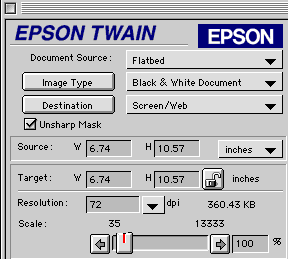
On the PC, I've used the settings below for the same reasons as above:

- Once you are
satisified with your choices, click "Scan."
- When the scan
is finished, a window like the one below will pop-up:

- Click "Next"
and the next page in your document will automatically be appended to the back
of your current document.
- When you are
finished scanning all the pages of your document, click "Done" and
you will be taken to your document as it will appear. You can flip through
the pages to verify that it looks the way you want it to. You can also test
out some of the features of Acrobat if you feel like it.
- Save your document
as "pdfscan.pdf" in your home directory and in your TurnIn folder
on the Groups drive.
- If you want
to add additional pages to your document go back to File>Import>Scan.
When the "Acrobat Scan Plug-in" window pops up, be sure that "Append
to Current Document" is selected under "Destination" and then
click scan.
- Be sure to save
your final document before quitting the program.
Part
2
Creating a PDF from an Existing Electronic Document
You
can use any machine in the lab, Mac or PC, for this part of the module.
- Open
Microsoft Word.
- Open
an existing document, paper, or project you have already created in the Word
Application (use your Wendell Berry document if you don't have anything else.
- On
a Mac, use the rainbow apple to open the Chooser. Click once on the "Acrobat
PDFWriter" icon. With the icon highlighted, close the window and return
to your document in Word.

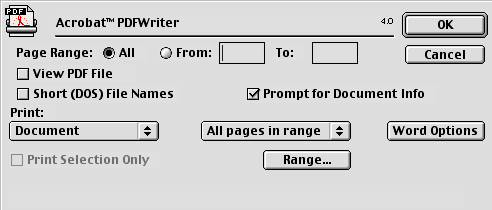
- In the print
window that pops up, be sure the the "Page Range" button is selecting
"All" and click "OK". A second screen will pop up asking
you to provide additional information about your document. Fill in what you
want and click "OK". This does not acutally print your document,
but instead makes a copy of it in PDF format. Your new document will be saved
in the same location as the original.
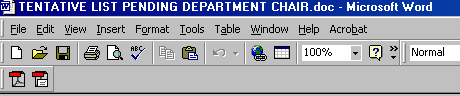
- On a PC,
Word may have an icon in the toolbar like the one below: If so, click on this
will automatically create a PDF and prompt you for a name and saving location.
- On a PC,
if the PDF icon is not visible in word go to File>Print and select "Acrobat
PDF Writer" under "Printer Name". Click "OK" and
then print again.
- Place a copy
of your document in both your home directory and the appropriate folder in
the Groups Drive. Name your document "pdfwriter.pdf" To make a copy
of your document on a Mac, click once to highlight the file and the click
command + D.