Using
Capture Technologies
module last modified: January 10, 2002.
PLATFORM
You can use the scanner on either the Mac side (attached to Jones) or the PC
side (attached to Cather).
PURPOSE OF THIS MODULE
This module should give you a basic familiarity with some of the capture technologies
we have available in the lab. You will learn how to do these things:
This Module
has Two Parts. Part 1 is shown below and contains information on scanning images
and slides. Part 2 can be accessed by clicking here
and contains information on scanning and creating PDF. You must complete both
parts to get full credit.
NOTE: Since there are almost 30 people in class, and you all will be wanting
to use the different scanners this week, you should probably reserve whichever
computers you need. Go to the lab and ask which computers (either on the PC
or the Mac side) have hardware and software fo slide scanning, and for color
scanning. To reserve a computer, find the reservation sheets that are hung on
the wall between the Macintosh room and the PC room (ask the consultant to help
you if you can't find them). You can reserve a computer up to 2 days ahead of
time, for up to 2 hours. Just put your name under the computer you want, next
to the hours you want. (Be sure you check that no classes are scheduled for
the time you want to use the computer: classes have priority.)
COLOR SCANNING
- Find a color
image (like a photograph) you own or one that is copyright free, to scan.
- Reserve the
appropriate computer. There are 2 scanners for color (1 on the Mac side- Jones,
1 on the PC side- Cather).
Before you sign in, make sure the scanner is turned on. If not, turn it on
and then restart the machine. Ask a consultant for help if you're not sure
how to do this.
- Login in the
usual way.
- Find "Photoshop".
Open the latest version.
Don't worry about any of the windows and tools that open up when you open
up Photoshop; you'll learn more about these in a future assignment.
What is important for you to know now is that the Photoshop application has
had a piece of software called a "plug-in" added to it, so that
it can control the color scanner. This is the software you will use to do
your scanning.
- On the Mac
side, place your photo or other image face down in the upper righthand
corner of the scanner and carefully close the cover.
One the PC side, place your photo or other image face down in the lower
lefthand corner of the scanner and carefully close the cover.
- From the File
menu, pull down to "Import", and then select (for the Mac) "Epson
Twain5" or (for the PC) "Twain 32" from the submenu that will
appear. A whole window will open up, to help you preview your scan and make
adjustments to it.
On the PC side, there will be a window open called FotoSnap. There
will be several pulldown menus on the left and a screen where your picture
will appear. Make sure they are set to Photograph, Color (RGB), Monitor 75
dpi, and 100%.
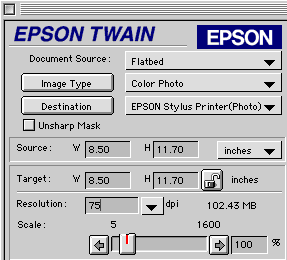
On the Mac side, Epson Twain version 5.0 will open with a brightly colored
window. You may get a message saying scanner is warming up and then it will
automatically make a "Pre-Scan" of your image. On the right is the
image scan area. The space on the left is for the controls. Using the dropdown
menus at the top, set the "Document Source" to Flatbed, and the
"Image Type" to Color Photo. In the middle of the controls, set
the DPI to 75, and then choose 100%.

- On the PC, in
the FotoSnap window, click the Preview button at the bottom of the window.
This will give you a quick idea of what your image looks like so that you
can make some adjustments to the image.
- Once the Preview
or Pre-scan is done, you will see a digitized version of your image in the
Preview window. You must now tell the computer which part of the image you
want to scan.
On the Mac side, choose the square with dotted edges. It is located
just to the right of your image preview. This is the marque tool. (On the
PC side, skip this step.
Move the cursor down over your image in the Preview window; the cursor will
change to crosshairs. Click and drag over your image so that there is a box
around just your image (or some part of it). Be sure you scan only your image,
and not all the space around it: I will remove points from your grade if you
turn in a scanned image that contains a whole lot more space than the image
because it significantly increases the file size.

- Once you have
shown the computer what part of your image to scan and have made any adjustments
to the preview, click the "Scan" button.
You will hear the scanner make some noise as it passes its light head over
your image, and, when it is done, your image will appear in the Photoshop
window on the screen. [ On the PC side, you must now close the scanning software
to work with the graphic in Photoshop.]
If you are adventurous, you could play with Photoshop now, getting a sense
of what it will do, but you will get a chance to manipulate your image in
the Photoshop module.
- Choose Save
from the File menu.
Choose the "PICT file" format.
Save the image to your Home Directory.
- Also save a
copy of the image to your turn-in folder in the "MacTurnIn" or "PCTurnIn"
(depending which computer you used) folder on the Groups Drive. Name the file
"CS" (for "color scan").
- If the PICT
file option dialogue box pops up, click on "OK."
SCANNING SLIDES (or negatives)
- Reserve the
computer that has the slide scanner adapter attached to it (Jones on the Mac
side) ahead of time, following the procedures described under "steps"
above.
- Make sure that
the slide scanner is turned on. (If the scanner is on, both the "power"
and "ready" lights on top of the scanner will be lighted.)
If the scanner is not on, turn it on. You must now restart the computer by
going to Special>Restart. You will then have to log back in.
- Open the Photoshop
application in the "Local Applications" directory.
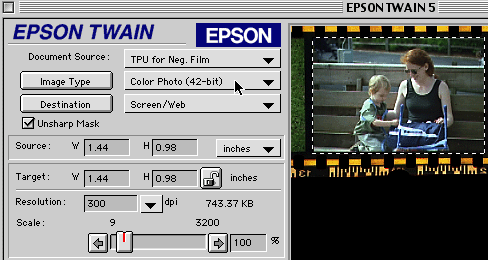
- From the File
menu, pull down to "Import·", and then select "Epson
Twain 5" from the submenu that will appear. The Preview window and the
Settings window should be visible: the name of the window shows at its top.
- You must plug
the Slide Adapter into the back of the scanner using the USB port. As you
look at the cable from the top, a small arrow should be visible if the cable
is properly aligned. The pins bend easily, so don't force the plug in if it
doesn't seem to be fitting.
- Set the slide
adapter on top of the flatbed glass.
- Place your slide
into the top of the adapter
- If your are
using a slide, ignore this step.
If you are using a negative, you'll want to turn your preview into a positive.
To do this, set the "Settings" as shown below.

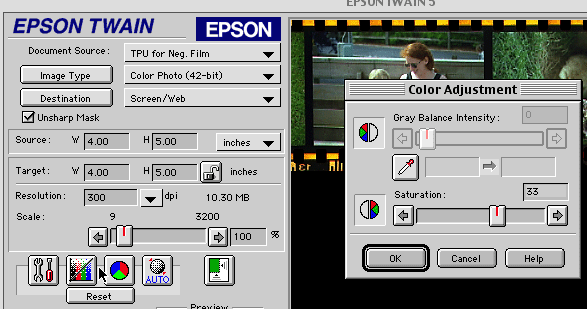
- If you want
to adjust how your image looks (perhaps the color looks too washed out to
you, or there isn't much contrast), click on the colorful pie-graph looking
icon:

- The slider
lets you adjust the amount of color saturation in your image.
- Feel free
to experiment with these settings, but again, I want the image to look
realistic for now so make sure to save a copy that looks realistic to
hand in to me and keep for yourself before you begin experimenting.
- When you scan
your slide or negative, do not set the resolution to higher than 300 dpi (dots
per inch), anything higher than this will make a HUGE file (and, for memory
considerations, you will probably do fine choosing the lowest dpi you can).
(For the purposes of this module, you can set the resolution to 72dpi, which
is what is used on the Web, but you can also set the scaling to 200 to 300%
if you like, so that your slide comes in at a good size.)
- When you have
finished scanning your slide or negative, save your photo as a PICT file and
name it "Slide" followed by your last name. Save one copy into your
Home Directory, and another to your turn-in folder in the "MacTurnIn"
or "PCTurnIn" folder 1n the HU2644 directory.
TURNING IN YOUR WORK
In each of the options above, there is a description of how to turn in the work
you do. All of the work you do in this module will be turned in electronically.
POINTS
Turned in on time 10
Color scan 15
Slide/Negative scan 15
PDF document from scan 15
PDF file from Word document 15
Instructor's Discretion 10
Bonus Tasks:
- Go back to the
color scanning. Go through the steps, scanning a color photo at different
dpi's. Try 25, 200, 300, 900. Make sure you scan the images at the same size
each time so that you can compare them. See what happens to your images. Save
at least 4 images with different dpi's. Save them in your home directory and
on the Groups Drive in your TurnIn folder. Name the files after the dpi you
scanned them at, e.g. "dpi25", "dpi200", etc.
- Do the same
thing with 2 other settings, scanning two different options each. (For example,
on a PC, choose 'Magazine Photo' and/or 'Illustration') Do the same thing
for the other setting (for example, change 'Color (RGB)' to 'Black and White'
and then to 'grayscale').
- Write a 250
word essay on what you learned about how the dpi and the 2 settings you chose
to change the image.
- Put all 8 bonus
images and the paper in your turn-in folder. There are NO hardcopies for this
project.
Bonus Points 20
Total Points ...............................................................................100
Return
to Schedule


